Friday, July 31, 2009

Who's Grading?

You may recall that I said I do not sew. Well actually, on occasion, I've been known to sew----for decorative purposes only. I think that I would probably sew more if it weren't for those horrid memories of Junior High Home-Ec sewing class. I remember unpicking more stitches than I sewed, or at least it seemed that way. I wanted my project (a cotton slip with lace and an elastic band waist) to be perfect so that I could get a good grade. Yes, I unpicked and unpicked and unpicked so much that I dreaded sewing and hated the finished product.
But lately I've been making some changes in my life. You see, I have spent my entire life only trying things if I first knew that I could do them well. I steered clear of experiences if I felt that I couldn't succeed.
But I have finally realized that I have held myself back from so many wonderful adventures in life. Why do I still feel, years and years after graduating from school, that I am being graded on my performance?
The real truth is,
I'm the ONLY one that's doing the grading!

Even if someone else comments on my performance, it's still MY CHOICE to let their opinion influence my life.
MY CHOICE!
And so, with those thoughts in mind, I pulled out the sewing machine, plopped my faded outdoor cushions on top of pretty fabric and got to work. About an hour later I proudly placed my newly covered cushions outside. I had a real feeling of accomplishment! Are the covers perfect? Let's just say that if I was being graded I would not get an A for quality. But I would get an A+ for effort----and that's really all that matters!
My family and friends will enjoy the new seating. It won't matter to them that the seams aren't perfect. They, and I, will appreciate the overall beauty and comfort of the cushions and the memories that we will make on our back patio.
I have the satisfaction of knowing that I created something beautiful. But even more, I have learned that life isn't about grades, it's about
learning,
making mistakes,
and realizing that making the effort
to learn and grow is when we
truly succeed.

Thursday, July 30, 2009

Get dirrty.

Sorry, I couldn't resist channeling Christina for a second. I have so many little projects I have wanted to share with you, but when I asked on Twitter -- the vote was for the outdoor project, so here. we. go. This one isn't nearly isn't as fabulous as the deck, and again, I feel like I'm probably preachin' to the choir. I'm sure most of you already know these tricks, but I like to share with the

Picture a Tray

The only negative thing about making a door into a table is that the uneven surface makes it difficult to display things. I could have topped it with glass, but seriously, who wants to have that additional cost, let alone clean a glass surface constantly.
My solution for creating an even surface is to
use a tray.
Oh how I love trays!
I'm pretty sure I have at least a couple of dozen of them, silver ones, wooden ones, store bought and handmade. But I thought I'd make one more.
I took out a wooden picture frame
from my stash.
Then had hubby cut and glue a piece of
scrap beadboard to fit the opening
(he enjoys taking part in my projects). I gave it a pretty coat of spray paint. And then gave it a good distressing.
My technique for distressing is pretty simple. I start by using my palm sander and scuffing up the areas that would naturally show wear, the edges, corners and under the handles. If I had used brush-on paint, I might have rubbed those areas with wax before painting so that the paint would wipe off easily to show the original layer. To add more character, I use a paint scraper. With both the sander and the scraper I make sure to vary the scuffs, heavy in some spots and lighter, or not at all, in others. If the scuffs are too uniform it doesn't look natural.
I then finish with a coat of stain or diluted brown paint.
I like working with water-based stains and paints because I can spray on a little water and wipe off as much stain as I desire. I try to leave stain in the corners and low areas that would naturally attract dirt and grime over years.Once dry, I added two old drawer handles. I could have added knobs, wooden balls or finials to the bottom for feet like I did on this tray, but I need my picture frame tray to have as much bottom surface area as possible. My new tray is beautiful and serves as a nice flat area on my door table to set my burlap lamp and other pretties.

Wednesday, July 29, 2009

Good time to renovate


Only six months remaining to take advantage of the Home Renovation Tax Credit (in Canada) which provides a 15% income tax credit on eligible home renovation expenses incurred between January 27, 2009 and February 1, 2010. The credit may be claimed on expenditures exceeding $1,000 but not more than $10,000 and will provide up to $1,350 in tax relief.
The idea behind the tax credit is to stimulate the economy and is a great incentive for homeowners to tackle some of the projects they have been putting off. You will enjoy your home more, increase its value and potentially reduce energy costs.
So if you have been thinking about renovating your kitchen or bathroom, installing new carpet or hardwood, landscaping, painting, or using the services of a professional, don't delay any longer - the work has to be completed by February 1, 2010. Remember to ask for receipts from all contractors and professionals. For more details, click here.

Do-it-yourself Inspiration


The above rooms are my favourites from winners of the Canadian House and Home Design Contest over the last three years. This year, the magazine has six new categories such as Best Use of Colour, Best Small Space, Best Decorating or Styling, Best Kitchen, Best Budget Style and Best House. So, start renovating and decorating and send your photos in.
I love the last image of the built-in which is simple and beautiful, and when I read that the homeowner built it for $800 with no training, I was doubly impressed.

Comfort and Joy

There is something about a throw draped over a piece of furniture that makes the room feel that much more inviting and comfortable. I wanted to achieve that same feeling on my porches, after all they're like a room---without as many walls.I went on a search to find something that would look both pretty and appropriate. With temperatures in the 90's and 100's it would look a bit odd to have a heavy throw resting on outdoor furniture.
While looking through a linen rack at my local thrift store I discovered a bunch of beautifully hand painted sarongs. These would make the perfect throws for my porches! They're large, lightweight and infused with color.
Now the furniture on my porches beckon one to sit in comfort, to rest for a few minutes and take in the joy and beauty of nature.

Tuesday, July 28, 2009

Got Holes?

I almost titled this post, "The most boring post ever in the history of mankind," or, "Read this to your kids to help them fall asleep tonight." Or, "Warning: Drowsiness may occur as a result of reading this post."But instead, I came up with "Got Holes?" Works, eh?So if the builder in your house was towel rod happy like ours was, you've probably got lots of these:I mean, they were giddy with

Monday, July 27, 2009

Plant It

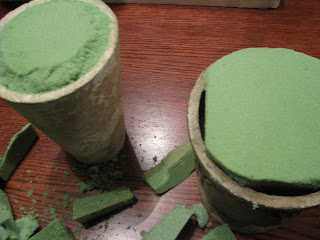
Last week I found two topiary wannabes at the thrift store. I knew that with just a little work I could help them reach their full potential as topiaries. I pulled out my stash of moss and dry foam (also purchased at the thrift store) and two pots, one from the thrift store and one from a plant I had managed to kill. I cut the dry foam to fit inside each pot, stacking one piece on top of another until the foam was just higher than the lip of the pot. I lightly pressed the foam on top of the pot to have a pattern to follow for cutting. Then I shaped the edge of the foam. I like it to look like it's mounding over the pot instead of sunken inside. I used hot glue to secure the foam into the pot and the topiary into the foam. Then, being careful not to burn my fingers, I planted moss on top of the foam. One pot was planted with the store bought moss, the other with moss that I took out of my yard and let dry for a few days.I'm thrilled with my new topiaries, especially since the total cost was less than five dollars.
Linked to Metamorphosis Monday and Southern Hospitality (Rhoda has a new address).

Open cabinet

I’ve always wanted open shelves at home…

Here is one of my favourites…


Sunday, July 26, 2009

Making your plain books pretty.

Hope you all had a wonderful weekend!! I have gotten a ton done, and hope to still get more done this evening. I've done about ten loads of laundry. TEN people. Hate it with a burning, searing passion.So for a little creative break, I worked on a quick project I've been wanting to do for a long time. Back when I showed you how to do my wallpaper art, many of you commented that you use wallpaper

Thursday, July 23, 2009

Clearing out the clutter.

Every time I've ever started a new job, I've always asked for a week off between the end of the old one and the start of the new one -- does anyone else do this?I always felt like I needed a week to get my life completely in order before starting a new endeavor. It's like cleaning the house before you go on vacation -- I need my mind to be free of the stuff like laundry, crap, clutter, dishes,

Dollars and Scents

Okay, I realize this post may seem a bit out of the ordinary, yet if you've visited with me for very long you know how much I enjoy finding inexpensive little pleasures. So I thought I would share.
Have you ever bought these delightful bottles of linen water at the dollar store?
They are wonderful for spritzing on your clothes when you iron. But being the non-ironing gal that I am, I've found another use for them. I love to spray them on my sheets and pillows right before I go to bed at night. The scent is very delicate yet it still freshens the bed and the room. Aaahhhh, talk about feeling just a bit pampered, smelling a little L'essence de Provence just as you drift off into dreamland!

Wednesday, July 22, 2009

Lettuce With a Touch of Ketchup

Last summer we built this table from an old door and stair balusters. It was designed to fill an awkward space between a window well and a set of stairs on our patio. It's tall so that it can function as a sofa table behind my wicker love seat. I originally painted the top red, (remember my ketchup and mustard theme?).In my effort to transform my patio into a more restful spot, I thought it was time to give the table a little paint makeover with a beautiful leafy green, reminiscent of a luscious head of lettuce. Then of course I distressed it with sandpaper and a paint scraper to unearth it's past. This little door has not only been red in it's former life, but has also dawned the colors white and baby blue.

Oh how I love a piece with age and character!

Tuesday, July 21, 2009

When FAB happens by accident. (And for FREE.)

So I've never considered myself a dumpster-diver. I mean, I will dig through the Goodwill shelves with the best of them, but trash just ain't my thing. But a couple months ago on the way out of the neighborhood, I saw something sitting at the end of a neighbor's driveway with the trash. I couldn't really tell what something was...I just saw it had GREAT legs. Long, curvy, sexy legs. I slowed..but

Sweet, Petite, and Beat

You know there's nothing like finding a few thrifty treasures to make one feel great again! I found this petite metal table while thrifting this past weekend. It was only four dollars and can you believe that I actually had to think about buying it. I'm trying to be selective with my purchases, asking myself where the item will go in my house. Once I decided the new home for this sweet table I bought it and brought it home and beat it with a hammer. You know me, I like things to show a little age and character and this table looked like it had just been spray painted. I'm hoping that now that I've knocked off some paint and chipped it up a bit, it will begin to rust a little too.
And as for it's new home,
it looks quite happy to be joining my finished metal chair.

One more doll artist - Marlain Verhelst

Just before signing off for a few days… I thought I’d ask a question…

Do you believe in fairy tales? Yes!! I’m still spellbound with the doll exhibition..

Here is featuring Marlain Verhelst, doll maker & artist from Netherlands. Please enter her world of dolls, fairies and animals. Her figures are so spectacular that you can tell a story behind each one of them. They will transport you to the world of stories & imagination. You will be as spellbound as me….

The one below is called… ‘Fly like a bird’… That’s how I feel today!!


I’m impressed about the online classes… go and check them out! I’m sure going to enroll after the summers and try my hands at Doll crafting!!

Monday, July 20, 2009

Living Room Inspiration


Love the cushion fabric and art as a pop of colour and
pattern in an otherwise neutral room.


Love the built-in, the symmetry, the tailored settees.


Love the comfy sofa in a neutral tone with the
zingy stripes and graphic area rug. Also love the
wee ottoman and the art display.


I thought I would share a number of images that typify my style. These are rooms that I would love to recreate for a client or have reflected in my own home.

(images from Canadian House & Home, House Beautiful)

Cheap Art

THANK YOU,
thank you, thank you for all of your well wishes and prayers! You truly warmed my heart and I can happily report that I'm feeling back to normal (although I'm sure my sons would likely say that I never have been "normal"). In fact, I felt so well that I managed to do a little thrift shopping. I was on the hunt for some cheap art for my back patio. In my effort to make the patio an extension of my home, I thought it would be wonderfully unexpected to display a few pictures and oil paintings.
I thought this vintage floral, along with the dream sign, would be ideal.
A few weeks ago I found this oil painting of an ocean landscape. Now when the weather gets too hot, I can sit on my patio with a tall glass of lemonade and envision myself at the ocean.
And this past weekend I found this charming floral oil painting.
The painting spoke to me. The frame did not, but I knew it would be a quick and easy fix. I removed the painting, put on my paint mask and sprayed the entire frame, cloth inset and all, a pretty shade of apple green.Now it looks fresh and fun and will be the perfect addition to my cheap patio art.
Linked to: Thrifty Treasures and Metamorphosis Monday