Friday, November 30, 2012
November in review!
Where I’ve Been and Where I am…
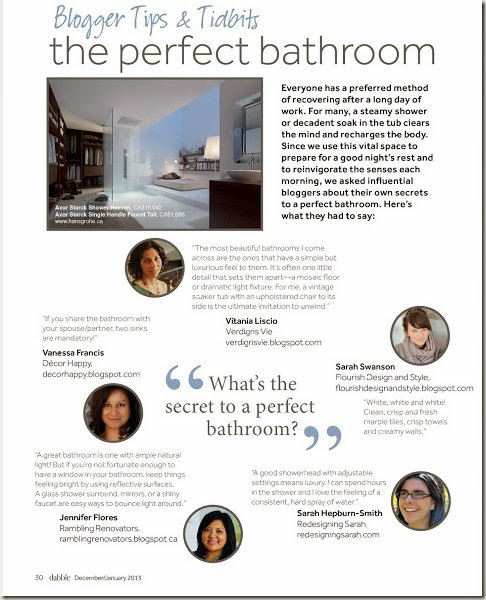
I also have a little mention with some other fab bloggers in the latest issue of Dabble magazine. It’s on one of my favourite design projects – bathrooms. You can read the entire issue here.

If you can’t read it, I say “If you share the bathroom with your spouse/partner, two sinks are mandatory.” If you have the space of course - don’t you agree?
This week, there were a number of fun events to attend. The first was an event hosted by DIY expert and friend Sarah Gunn of the Yummy Mummy Club. We all experienced an Oprah moment when we took home a Brother all-in-one colour printer. It even prints 11x17 and I can’t wait to use it. Thanks Brother!
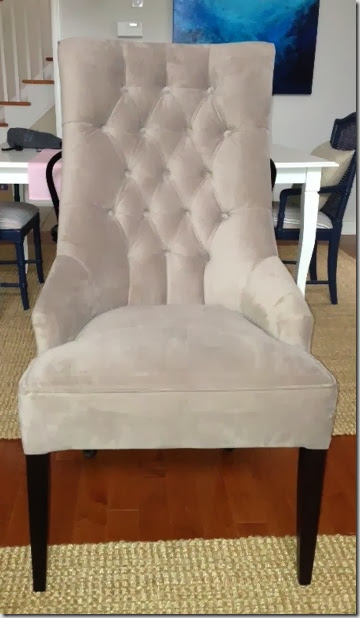
Then, I attended an event at Decor-Rest with a presentation by Para Paints as well. I love both of these companies and was happy to hear what’s new with both. My luck continued as I also won a chair! I have no idea where I will put it, but isn’t she pretty? It would be a great end chair for a dining table.

Oh, and the Home Depot Canada has launched special holiday collections from Martha Stewart Living. There are three different collections – Winterberry, Arctic and Celebrate. They sent me some ornaments from their Celebrate collection which are golds and bronze and will look perfect on our tree. Below is a pic of their Winterberry collection.
That’s it for now! Sorry I haven’t been blogging much lately. You know how it is, right? Please stick around though because I will have some client projects to share over the coming weeks/months. And I can’t wait to share our newly decorated den – just waiting for it to be published online first!
Room Design Giveaway
This giveaway is now closed.
Since I stopped taking online design clients last year, many of you have asked what other designers I would recommend. One of them is Camila.
Besides being Hudson’s mom, she is also author of the beautiful blog, Effortless Style. And, she just happens to be taking new online design clients.
I’ve always been drawn to Camila’s style because it’s colorful, livable, and fun:
If you’re wanting to make some updates to (or completely change up) one of your rooms, her “style boards” are the perfect starting point:
Her style boards are valued at up to $1200 and she’s giving one away!
Here’s what’s included:
- Floor Plan/ Furniture Layout: Mock up of where everything should go.
- Furniture & Accessory Picks: Boards with product images, pricing.
- Material Picks: Boards with paint, fabric, wallpaper options, window treatment options, flooring, hardware
- Design Plan: Instructions on who to execute the look. (Includes notes for to achieve DIY projects, if applicable.)
- Shopping Guide: List of links for all of the items that are needed to achieve the design plan.
(Style plans do not include kitchen or bathroom remodels. Winner must redeem style plan within one year. Once the client receives the style plan, they have up to two additional hours to ask Camila any questions or to have her make any tweaks, etc.)
And, since the holidays are upon us, Camila has offered to let the giveaway winner redeem their prize in the form of a gift certificate if someone on your list needs a style plan more than you do :) (I would totally keep this for myself, but that’s just me. . .)
To enter, just leave a comment on this post letting me know what room most needs Camila’s help. For an extra entry, “like” Effortless Style on Facebook and leave another comment letting me know.
(Two entries maximum, and please make sure I have a way to contact you if you win. I’ll choose the winner at random and announce on Thursday, Dec. 6th.)
Good luck!,
Thursday, November 29, 2012
Baby Shower at Designing Life
I simply couldn't believe Sonam put this diaper cake together... You've got to check her blog for more details on this...
This is her Sister in laws baby shower... Its so super cute...
... and the baby...
Oh.. I love.. these little hanging decorations.. *smiles*
Aren't the colours just gorgeous...
Finally the cake...
Do check Sonam's blog.. for more on this baby shower... Its super cute indeed... *smiles*
How I space plan (and a basement sofa!)
Trophy Love Two


 I think it looks great!
 Wednesday, November 28, 2012
Holiday Craft Ideas (What We Made)
As a follow up to yesterday’s post, I wanted to share the specific projects the guests at our holiday crafting party were able to make and take home.
We set up three different “stations” based on the themes of paper, moss and nature, offering a couple of different crafts at each one. What I like most about the projects is that almost all of them could also be used throughout the year. Here’s what we made:
(Yes, we tore up books for these projects. If it makes you feel better, they weren’t very good ones…)
The book page trees were one of the easiest crafts we did. (And, I think they have a fun Anthropologie vibe.) We pre-painted two sizes of terra cotta pots with spray chalkboard paint, and provided skewers in two lengths. (I just bought inexpensive dowel rods, cut them to length and used a pencil sharpener on each end.)
Once I was ready to start stacking the book pages, I first used pages torn in half, then torn in thirds, in fourths, etc., working my way to the top. (We didn’t pre-cut anything.) Older books work great because the pages almost fall apart when you fold them.
This is a super easy project for kids, too. (Unless they try to stab each other with the skewers. . .) Of course, they also think it’s fun to be able to tear up a book without getting in trouble.
We also made book page wreaths. Simple? Yes. Time-consuming? Double yes. But, it’s a great craft if you’ve got a friend to do it with, time to work on it and lots of glue sticks. We just used straw wreaths (with the plastic still on) and rolled each page into a cone, hot gluing them to the wreath in layers.
I found that it was easiest to start by turning the wreath over, hot gluing two layers of longer book pages to the back. Then, I flipped it over and glued shorter pages to the front in layers. It may look a mess while you’re doing it, but you really can’t mess it up.
Mine is now hanging on the front of the bookcases in our office:
At this station, everyone did their own thing, with the option of making a moss-covered wreath, trees, or topiaries. Here’s what we supplied:
- Styrofoam wreath, ball and tree forms
- A variety of pots and small urns
- A mixture of moss
- Embellishments like faux fruit and glittery styrofoam balls
- Rubb ‘n' Buff (to decorate the plain terracotta pots)
- Hot glue guns
Since some of the other crafts took more time, we wanted to offer a station where they could quickly put together another project to take home. For the “nature” station, we supplied several driftwood pieces, succulents, air plants, pinecones and hot glue guns.
These make great centerpieces or accessories to set on a coffee table. Here’s a similar one I did and dressed up for our holiday table:
What holiday crafts are you planning to make this year?
Tuesday, November 27, 2012
Artist Intro ~ Amrita Rao
On Colours Dekor today... is Amrita Rao ...
Over to Amrita..
I'm a self-taught artist focusing on oils on canvas. My passion for art has been a long-standing one, right from childhood. I've always loved color, and loved drawing and been encouraged by my father who is an amateur artist himself. He made it possible for me to play with oil pastels, watercolor, sketch pens and even oil paint at a young age. There were also books about the great masters always lying around at home. My earliest remembrances of school competitions have been of drawing and painting!
As I grew up however, studies, marriage and then work took a more important place in my life and I almost lost touch with the artist in me. However, there came a turning point in my life after the birth of my daughter as I could not work full time and ultimately stopped working so I could look after her better. I was at a loss at the time to know what to do with myself the rest of the day when she was at school and it was my mother who reminded me about my artistic talents and urged me to take the step to become a professional artist. I started with pencil sketches at first but soon switched to oils as I simply love colors and cannot be happy unless I've created something vibrant.
Over the last year and a half, I've painted a variety of paintings - still life, portraits, landscapes and abstract. I've sold four paintings and made two custom-made ones (not reproductions, I could never bring myself to copy) to suit the wall color and general color scheme of my client's home. I'm as yet discovering the scope of my gift and developing my style. I enjoy the freedom of not having to stick to schedules everyday and yet have a sense of accomplishment at the end of the day. I've discovered creative work is as taxing and tiring as any job but so much more enjoyable, satisfying and uplifting. Whatever I see now inspires me to paint and my mind is always busy thinking about a new work of art! I hope you will all enjoy looking at my works as much as I have enjoyed creating them.
Do leave a comment.. and inspire the artist.. *smiles*


